Thursday, July 24, 2014

Interim Update

It's been a while since I posted anything, and that's mainly because I haven't been working on any big projects! It's supposed to be a nice weekend, so I think I'm going to start working on redoing my telephone table. I still haven't decided on a color to paint it, but I have a few fabric remnants I'm going to try out and pick a color from one of their palettes.

I have now signed up for TWO craft shows/fairs in August where I will be selling my cat beds! I mentioned before that I had some sweater stock to work through. I forgot to take photos before packing the new ones away, so instead I thought I would show this photograph evidence that my Lily insists on trying out each and every bed I make. These pictures were taken over the past 7 or 8 months. 


And the current work in progress:


I've also been doing a little fun crocheting as you may have noticed, between my baby bat and penguin... Here's the latest little one to add to the mix. I found this pattern through Pinterest and it used a thinner yarn and smaller hook size than I had ever used before, so I thought I would give it a go. He's only a few inches tall. It took about two evenings to get him finished, so if I get through all my cat beds before the craft shows, I might quickly make a few of these guys to try to sell. 


The craft shows I'm selling at are on August 16th and August 23rd. I'll post some info on location and time when they get a little closer, in case you want to stop by or spread the word!

Wednesday, July 16, 2014

Craft Show Stock

I signed up for a craft show in August to sell my sweater cat beds! I have a decent amount made already, but I also have a bunch of sweaters I acquired at sales over the past couple of months. These are really cute colors and patterns too, so I'd like to try to get most of them done before the show. I finished two today, so I thought I would show some in progress photos with a mini tutorial. 

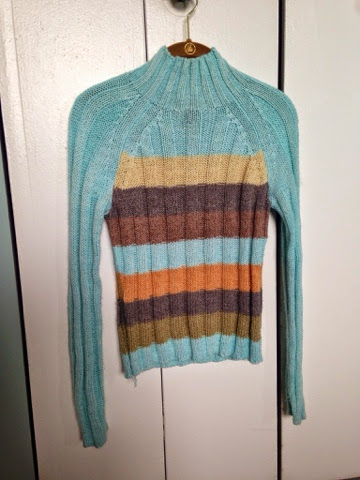
This is the sweater I started off with. It has a mock turtleneck, which is perfect for this project. Turtlenecks or mock turtlenecks are best, but crew neck also can be used. 


First thing to do is sew up the neck hole. Flip it inside out and sew with a big needle and piece of yarn. I usually pin these first so I keep it even as I'm stitching. 


Once that's finished and tied off, flip the sweater right side out again and pin across the chest of the sweater from arm to arm in an arc shape. Sew through both layers of sweater to create a long pocket connecting the arms. 


After that, stitch the inner edge of the arm to the side edge of the sweater body on both sides. I work about 2/3 or 3/4 of the way down the side of the sweater. 


Here's where it starts to actually look like a cozy bed. Start stuffing the pocket you created and the sleeves with fiberfill or scrap fabric, and continue stuffing until there are only a few inches of empty sleeve left. 


Then the sleeves need to be connected. Stuff one inside the other and pin closed to prepare for sewing. 


The last piece of this project is to fold the bottom edge of the sweater up around the sleeves and sew in place. This creates the finished bottom of the bed surrounded by the cosy sweater. 


This is a relatively inexpensive project if you have basic sewing skills and can find a cute secondhand sweater. I think it looks like a hug for your cat!


And on an unrelated note, this little guy came to life today! 


Makes you smile, doesn't he? 

Saturday, July 12, 2014

Baby Bat Amigurumi

Two for one blog day! This is just a mini post to show a little bat I whipped up in a couple nights. I used a combination of free patterns I found on Ravelry because I didn't like any one of them by itself. I added a little button and loop on his wings so they could stay closed while he sleeps. ;-)


Cute, right??

Bedroom Makeover

I'm finally ready to show some before and after pictures of my bedroom! I finished painting a couple weeks ago but I was held up by my incomplete curtains, which I'll talk about in a minute. Here are some before pictures from one of the first couple days after I moved:


The room is very large as far as bedrooms go, and the wall of closets is awesome. Here it is today, after a few coats of paint, furniture rearrangement, and decorating:


I'm really happy with how the room turned out. The color is peaceful and relaxing. You can see where I chose to hang my embroidery hoop fabric collage, and I changed out the knobs on the closet doors.

About the curtains... There are a few utilitarian household items that I always think are overpriced - rugs, lamps, and curtains mainly. I really hate spending a lot on any of those things. So when I first moved in, I scoured the clearance bins in the curtain section of Bed Bath and Beyond and found two matching curtain scarves that were meant to be used as a decorative add-on to window treatments. They were made by Sound Asleep ("The Official Curtains of the National Sleep Foundation") - aka room darkening, which was a feature I was hoping for as the room gets a good amount of light. Premade Sound Asleep curtains would have cost at least $50 per panel, and my window is double-wide so I'm not even sure how many panels I would have needed. Instead I snagged these two scarves for $7.99 each and my mom and I customized them. 


My mom was very eager to help me customize curtains, so we did some measuring and decided to optimize the room darkening qualities of the fabric by creating three layers. I couldn't decide how I wanted to finish them off, so she left them unhemmed. I hung them anyway for the past few months to block the light, and in the meantime I decided to make some crocheted edgings for each layer of the panels. 

Miraculously, I found a package of six brand new skeins of yarn in the perfect color at a church rummage sale for fifty cents!! That yarn was probably worth about $40 truthfully. I found the crochet edging patterns in a free Kindle Ebook, and did them myself. When I finally finished crocheting the six edges, I took the curtains down and my mom hemmed them so that the edges would overlap slightly. I completed them by hand sewing the crocheted edges along the bottom, and rehung them this morning. 


I used three different edge patterns from this Ebook: http://www.amazon.com/gp/aw/d/B00IUQ9A98?pc_redir=1404622940&robot_redir=1. It was free when I downloaded it, but it seems to be $2.99 now. Here's a close up of some of the work:


I think they came out beautifully, and because we customized them I was able to get exactly what I wanted. And it is very exciting to me that I have a pair of custom curtains for a total cost of about $16.50, plus the clips to hang them and the curtain rod (both of which were also on clearance). 

What do you think? 


Monday, July 7, 2014

Shelf Update & Window Upcycling

When I made the shutter shelves, I had really wanted to add decorative brackets but couldn't find them anywhere! As I had them on the wall I was becoming increasingly nervous about the shelves not holding up and my Willow Tree collection crashing to the floor.


I searched around on eBay for a week or so and found the perfect black wrought iron brackets. Great size, nice design... They came today and of course I attached them immediately. I am so much happier with the shelves now, and no longer worried that they will fall!


This next project is incomplete, but I figured I would post it in-progress. In the beginning of June I picked up this great old window. Two guys were redoing windows at their house, and were nice enough to even put it in the car for me. I cleaned up the window, scraped off the loose, chipping paint with a wire brush, and then sanded down the rest of the wood to smooth it out. I also found these great metal and ceramic fleur de lis hooks that I attached on each side. 


I have a thing for old black and white photos, and I thought this window would be a perfect way to display some pictures of my family. I am not totally satisfied yet with the pictures because I know my parents have more somewhere.  There are no photos of anyone on my dad's side of the family, so this is still developing. 


I also intend to add a narrow shelf along the bottom like a windowsill, and I'm thinking about a light wreath to hang in the center from a ribbon, and position the photos around it. It's a work in progress, but I'm a lot happier with it hanging on my wall than leaning against it! 


Last but not least, I finished one pair of flip flops


Hope you guys are enjoying reading about my projects! I know I'm enjoying writing about them. 

Saturday, July 5, 2014

Frames

I've been collecting ornate picture frames for a couple months now, with a Pinterest project in mind. After my great garage sale haul last week, I had enough to get started.


I started off by priming all the frames because they were all different colors and finishes. I let them dry overnight in the middle of my living room:


The biggest frame in the photo (upper right) was a roadside rescue! The rest I paid somewhere between 50 cents and $3 each for. The $2/$3 ones were more expensive because they were actually framed prints with glass, and one was a mirror. 

The next day I gave them each two coats of paint. The paints I used were the leftover sample jars I purchased when I trying to choose wall colors! So not only do the colors all coordinate well with my decor, but it was also a good use of already purchased materials!


Again I let these dry overnight, particularly because it has been so humid lately. Today I finally cleaned up the drop cloth from the middle of my living room and set to work arranging the frames in a pattern on the floor. 


As you can see, Lily wanted to be involved but not actually help at all.  

I hung all of these today on the wall behind my dining table, and I think it looks fabulous. 


I'm very happy with how these turned out and I think I have just enough! I'm definitely running out of useable wall space now! :-)