Showing posts with label home decor. Show all posts

Monday, July 7, 2014

Shelf Update & Window Upcycling

When I made the shutter shelves, I had really wanted to add decorative brackets but couldn't find them anywhere! As I had them on the wall I was becoming increasingly nervous about the shelves not holding up and my Willow Tree collection crashing to the floor.


I searched around on eBay for a week or so and found the perfect black wrought iron brackets. Great size, nice design... They came today and of course I attached them immediately. I am so much happier with the shelves now, and no longer worried that they will fall!


This next project is incomplete, but I figured I would post it in-progress. In the beginning of June I picked up this great old window. Two guys were redoing windows at their house, and were nice enough to even put it in the car for me. I cleaned up the window, scraped off the loose, chipping paint with a wire brush, and then sanded down the rest of the wood to smooth it out. I also found these great metal and ceramic fleur de lis hooks that I attached on each side. 


I have a thing for old black and white photos, and I thought this window would be a perfect way to display some pictures of my family. I am not totally satisfied yet with the pictures because I know my parents have more somewhere.  There are no photos of anyone on my dad's side of the family, so this is still developing. 


I also intend to add a narrow shelf along the bottom like a windowsill, and I'm thinking about a light wreath to hang in the center from a ribbon, and position the photos around it. It's a work in progress, but I'm a lot happier with it hanging on my wall than leaning against it! 


Last but not least, I finished one pair of flip flops! 


Hope you guys are enjoying reading about my projects! I know I'm enjoying writing about them. 

Saturday, July 5, 2014

Frames

I've been collecting ornate picture frames for a couple months now, with a Pinterest project in mind. After my great garage sale haul last week, I had enough to get started.


I started off by priming all the frames because they were all different colors and finishes. I let them dry overnight in the middle of my living room:


The biggest frame in the photo (upper right) was a roadside rescue! The rest I paid somewhere between 50 cents and $3 each for. The $2/$3 ones were more expensive because they were actually framed prints with glass, and one was a mirror. 

The next day I gave them each two coats of paint. The paints I used were the leftover sample jars I purchased when I trying to choose wall colors! So not only do the colors all coordinate well with my decor, but it was also a good use of already purchased materials!


Again I let these dry overnight, particularly because it has been so humid lately. Today I finally cleaned up the drop cloth from the middle of my living room and set to work arranging the frames in a pattern on the floor. 


As you can see, Lily wanted to be involved but not actually help at all.  

I hung all of these today on the wall behind my dining table, and I think it looks fabulous. 


I'm very happy with how these turned out and I think I have just enough! I'm definitely running out of useable wall space now! :-)

Saturday, June 28, 2014

Bathroom & Vintage Pyrex

Guys, this is why I've been absent from blogging for a few days.

Before:
White white white


After:


I've been trying to get this bathroom finished for a few days now and ran into all sorts of problems. I need to do some touch ups because the paint is peeling in places (ugh!!) and my edge lines are much less than perfect. But it's mostly done and I love the color! 

Today we have some serious yard-saling planned for the morning. Going to be on the lookout for some treasures. I've decided to hunt for an old fashioned telephone to use on my old fashioned telephone table. I asked the employees at Somerville Antiques Center if they could estimate what decade my piece is from, and they said the fact it is wood as opposed to chrome indicates 1940's, but the vinyl seat would indicate more the 1950's. They told me to check under the vinyl to see if there is an original fabric, which would confirm 1940's but had just been recovered. Which makes me think, when I recover it maybe I should go over the vinyl instead of removing it - to preserve the history, you know? Still thinking about the colors for it, but I'm pretty sure it's going to go right here after removing the quilt rack and shifting things around:


So to keep in the correct time period as the table, I'm going to look for either one of those old black phones or the fancy French style ones. It would be great if I could actually use it for my landline, we will see what I can find. 

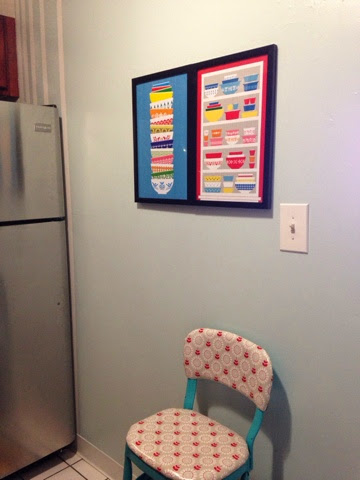
Last night I took a stroll through the Friday night events in Downtown Somerville, and despite my lack of interest in cars, it was pretty cool to see all the classic cars lining Main Street, and the guys standing next to their cars speaking all proudly about them. That's when I wandered into the antique store and asked about the table, and I also went digging for what I look for every time - vintage Pyrex. They have a ton but most of it is either in complete sets or just boring patterns. I've been looking for small individual pieces to use as accents in my kitchen, specifically to match some of the pieces featured in this poster from Pocono Modern:


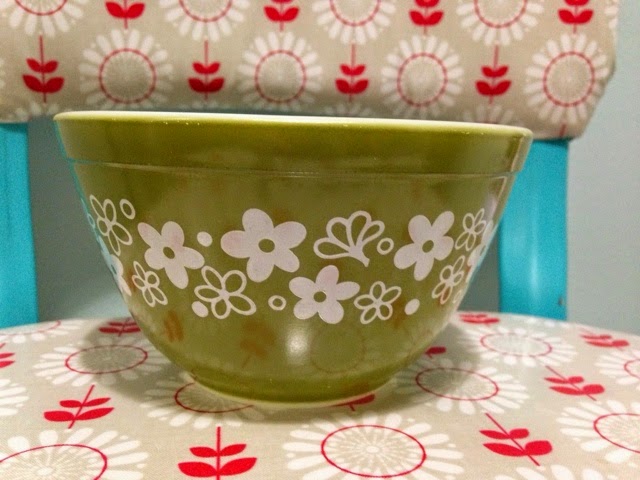
This was the first piece I found a couple months ago:


Last night I found three more!! I wouldn't have typically purchased all three at once, but it's been so hard to find specifically what I am looking for. 


The last one is not actually on the print, but I've never seen one like it and it was very reasonably priced.

I need to figure out a good way to display them. I was thinking for them to go across the top of my cabinets, but I still need a display method. Maybe small cake stands? 

Have a great Saturday everyone!!


Tuesday, June 24, 2014

Handmade Wall Art

Tonight I dropped my roadside treasure at my parents' house, where it will reside in their garage until I refinish it. Don't judge a book by its cover... It looks rough now, but think of the potential!


Awhile back on Pinterest I was searching for ideas for making large, inexpensive wall art. Something that came up quite a few times was the fabric wall collage. The first one I did right away for my living room:


The second one I completed last night for a wall in my bedroom. Instead of canvases like above, the fabric in this collage was stretched across embroidery hoops. 


I've been collecting the hoops for a couple months from flea markets and garage sales, and a few were given by my mom, who no longer uses them for their actual purpose. Over the weekend I dug through the remnant tables and bins at Fabricland and found all of the fabrics. A few of the remnants are pretty large - up to a yard and a half! - which leaves me a nice amount of fabric for some other future project. All in all, the fabrics cost $13 and I think all together I spent about $7 on the hoops between the different sales. 

To start, I framed the fabric where I most liked the design placement and trimmed the edge to about 1 inch around. 


Using a glue gun, I applied hot glue along the inner rim and glued down all the edges so it would be neat. This is not really necessary if you think you might use those hoops again in the future or might want to change out the fabric seasonally, but I chose to use glue to keep them sturdy. 


I repeated this process on all of the hoops. 


Having tried to hang these in the past and realizing they will fly off the wall (and frighten the cat) if it's particularly windy outside and my windows are open, I tried a different approach. I used a combination of a single nail to hang each one, plus some clear, removable & restickable wall adhesive. I am hoping even when windy, the adhesive will keep them from flying away. 

I thought it would be a good idea to lay out my design arrangement on the bed before starting to hang them, but Lily had other ideas:


After removing the cat I was able to finish hanging the hoops, and I really think it turned out nicely.


A design like this is versatile because I will be able to add on to the collage any time I want to. I'll remain on the hunt for wooden embroidery hoops so when the mood strikes, I'll be ready. 

Saturday, June 21, 2014

Saturday Recap

Today was not the best garage sale day. I didn't find any good project material, but I did get a few Halloween and Christmas decorations for two bucks a piece!


I spent the rest of the day painting my bedroom. I think it came out really pretty - but I still need to rehang my artwork and finish making my curtains, so before/after photos will have to wait. Instead, here are photos of my living/dining room and kitchen, which I finished painting and decorating last weekend.

Before - the week I moved in:


After:


Paint colors are Glidden Oolong Tea and Dill.

I don't have any before photos of the kitchen, but here it is currently after last week's paint job:


Paint color is Glidden Enamelware. 

I'm really pleased with how cozy my apartment is feeling now!


Wednesday, June 18, 2014

Trash to Treasure

This has got to be my favorite hobby right now. I find something really exciting about getting something free or very inexpensive, and being able to visualize it's potential - and then to actually execute it is awesome. Here are some that I have completed and am pretty proud of.


Cosco chair/step stool, purchased for $3.00 at an estate sale. Refinished with turquoise Rustoleum spray paint, a remnant of vinyl purchased online, a few other necessary supplies, and some serious elbow grease.  Definitely worth it! It's one of my favorite things in my home:


Little wooden cabinet.. Certainly not trash to begin with, but I got it for $30 at a garage sale. So far all I've done is paint the inside and add some little blue knobs from Hobby Lobby, but it might get a continued facelift sometime soon:


I'm in love with this silhouette of Lily. I've been wanting to do something like this for a long time, and when I spotted this wooden frame at (you guessed it) a garage sale, it was the perfect (purrrfect) inspiration (inspuurrrration). The frame was in two pieces when I found it, and I think I got it for 50 cents. It only needed minor repairs and some cleaning up. I created the black silhouette from the below photo of Lily that I took about seven years ago, and printed it on scrapbook paper before framing. I'm still deciding on the perfect place for it. 


This is not a recent project, but both of these pieces were garage sale finds as well. The little table was $30 and an unattractive shade of not-quite-lime green when I bought it, and the mirror was somewhere between free and $3.00 - can't remember. I painted them both a nice crisp white and I think they complement each other well. 


Also a Pinterest inspiration, I made a bunch of these cute little mason jar sewing kits recently, hoping to sell them at a craft fair. I found the sewing kit supplies at a flea market for 50 cents per set, I bought a pack of little mason jars at WalMart, and made the pin cushion tops with some scrap fabric I had and a little bit of stuffing. So far I haven't sold any yet, but they are adorable and I'm sure someone will love them as much as I do.


Lastly, I wouldn't call this a trash to treasure creation, but I made this large piece of wall art with some inexpensive 12"x12" stretch canvases from Michael's and twelve pieces of upholstery fabric from the remnants table at Fabricland. None of the remnants were more than $2.00, and I wound up with some extra that I can use for a future project. This was my solution to filling a large empty wall without spending hundreds of dollars. In total the project cost about $50 and was very quick. 


I had a couple extra canvases, so I wrapped them in two tea towels I found that matched my kitchen decor perfectly. I secured all the fabric in the back with thumbtacks, because that's what I had. I'm sure a staple gun would be more effective and cheaper if you already own one. 


I have a bunch of works in progress as well as future projects lying around the house. Those posts will be coming soon!